Our Professional Process
Phase 1 - Pre-Assembly Preparation (Steps 1-20): Schedule appointment, confirm furniture delivery, review assembly instructions, prepare specialized tools, conduct on-site assessment, verify package completeness, inspect for damage, prepare work area, organize assembly station, carefully open packages, inventory all components, verify against parts list, identify wood grain orientation, pre-sort hardware, identify pre-installed components, review full assembly sequence, identify required assistance, check for tool requirements, photograph components if requested, establish assembly timeline.
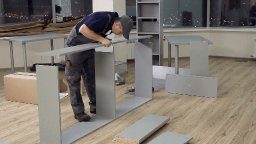
Phase 2 - Foundation Assembly (Steps 21-40): Identify base components, prepare base panels, install leg plates and mounting brackets, attach furniture legs, install leveling feet, assemble platform bases, install hidden hardware (cam locks, dowels, confirmat screws), position side panels, connect base to sides, verify squareness, install back panels, add interior supports, install fixed shelves, prepare for top panel, install top panel, final tighten foundation fasteners, install stabilizing brackets, check for wobbles, install decorative base trim, document foundation completion.
Phase 3 - Drawer & Door Installation (Steps 41-60): Identify drawer components, assemble drawer boxes, install drawer slides, test slide operation, install drawer fronts, adjust drawer alignment, install drawer pulls and knobs, test all drawers, identify door components, install door hinges, install hinge mounting plates, hang doors, adjust door alignment (height, depth, lateral), install door catches, install door hardware, install soft-close dampers, test door operation, adjust glass door panels, install door stops, final door and drawer inspection.
Phase 4 - Adjustable Shelving & Accessories (Steps 61-75): Install shelf pin holes if needed, insert shelf support pins, prepare adjustable shelves, install adjustable shelves, add shelf brackets, install glass shelves, install shelf lighting, add drawer dividers, install hanging rods, attach mirrors, install jewelry trays, attach cable management, install keyboard trays, add wheels or casters, final accessory check.
Phase 5 - Final Adjustment & Quality Control (Steps 76-95): Overall structural inspection, re-tighten all fasteners, adjust leveling feet, calibrate door gaps, optimize drawer alignment, test all moving parts, verify hardware tightness, clean all surfaces, inspect finish quality, test weight capacity, verify stability, check for sharp edges, test locking mechanisms, verify electrical components, document serial numbers, remove protective films, position furniture, secure to wall if required, verify clearances, final client walkthrough.
Phase 6 - Cleanup & Documentation (Steps 96-105): Collect all packaging, organize leftover hardware, sweep/vacuum work area, dispose of waste, photograph completed assembly, provide care instructions, verify warranty registration, collect payment, request feedback, offer follow-up scheduling.
Preparation
Before our technician arrives, please ensure all furniture packages have been delivered to your home. Clear at least a 10x10 foot space for assembly work area in or near the room where the furniture will be placed. If possible, have assembly instructions available - most can be found online by model number. Identify the final placement location for the furniture. For tall furniture like bookcases, dressers, and wardrobes, locate the nearest wall studs if wall anchoring is desired. Remove any fragile items from the assembly area. Ensure our technician can access the room and work area easily. For large bedroom or living room sets, it is helpful to clear a path from the front door to the assembly room. No tools are needed - we bring everything required for a complete professional assembly.
Testing & Quality Assurance
Structural stability test: Gently push assembled furniture in all directions to verify no wobbling or rocking
Drawer operation test: Open and close each drawer 3-5 times to verify smooth, quiet operation without binding
Door operation test: Open and close each door 3-5 times verifying no rubbing, catching, or misalignment
Soft-close mechanism test: Verify soft-close dampers on all drawers and doors function properly
Weight capacity test: Gradually load shelves to verify no sagging or deflection
Level verification: Use spirit level on top surfaces and along sides to confirm proper leveling
Hardware tightness check: Verify all knobs, pulls, handles, and hinges are secure
Lock mechanism test: Test all locking functions with provided keys
Anti-tip test: Verify wall anchoring brackets are firmly attached and properly secured
Electrical component test: Test all built-in lighting, USB ports, and power outlets if present
Assembly warranty confirmation: Client is advised of 30-day workmanship warranty on all assembly work